Build a Minimalist WYSIWYG HTML Editor With WYSIHTML5

For a lot of HTML forms you really don’t need much more than the basic form fields that HTML provides. For some projects however you might need a little more. If you want your users to be able to add some styling, formatting or links you’re likely to use a third party editor like CKEditor or TinyMCE. Both of these are fine if you need all of the cool features they provide but sometimes those are overkill. What if you simply want bold, or italic features and maybe ordered and un-ordered lists? WYSIHTML5 makes it pretty simple. You can grab WYSIHTML5 from Github. To add a little style we’ll use Twitter’s Bootstrap framework and Font Awesome icon fonts. Copy the WYSIHTML5 files into the correct directories.
├── css
├── fonts
└── js
    ├── advanced.js
    └── wysihtml5-0.3.0.js
‘wysihtml5-0.3.0.js’ can be found in the ‘dist’ directory and ‘advanced.js’ in the ‘parser_rules’ directory. Now to integrate WYSIHTML5 all you need to do is include it in our page along with Bootsrap and Font Awesome.
<link href="//netdna.bootstrapcdn.com/bootstrap/3.0.3/css/bootstrap.min.css" rel="stylesheet">
<link href="//netdna.bootstrapcdn.com/font-awesome/4.0.3/css/font-awesome.css" rel="stylesheet">
    <script src="//netdna.bootstrapcdn.com/bootstrap/3.0.3/js/bootstrap.min.js"></script>
    <script src="/js/wysihtml5-0.3.0.js"></script>
    <script src="/js/advanced.js"></script>
Now we can build the form with our editor. There is slightly more coding involved with integrating WYSIHTML5 than some other editors but this allows us to be more flexible.
<form method="POST" action="/" >
<div class="row">
<div class="col-md-3"></div>
<div id="toolbar" class="wysihtml5-toolbar btn-toolbar col-md-9">
<div class="btn-group">
				<a data-wysihtml5-command="bold" class="btn btn-default">Bold</a>
				<a data-wysihtml5-command="italic" class="btn btn-default">Italic</a>
			</div>
<div class="btn-group">
				<a data-wysihtml5-command="insertUnorderedList" class="btn btn-default">
					<i class="fa fa-list-ul"></i>
				</a>
				<a data-wysihtml5-command="insertOrderedList" class="btn btn-default">
					<i class="fa fa-list-ol"></i>
				</a>
			</div>
</div>
</div>
<div class="form-group row">
		<label for="editor" class="col-md-3 control-label">Job description</label>
<div class="col-md-9">
			<textarea id="editor" class="form-control " name="description" cols="50" rows="10"></textarea>
		</div>
</div>
<div>
		<input class="btn btn-primary" type="submit" value="Submit">
	</div>
</form>
The form with a textarea is simple enough. To use WYSIHTML5 we create our own toolbar in HTML5. The ‘data-wysihtml5-command’ directive is what WYSIHTML5 will hook into to add functionality to our plain textarea. We added the ‘btn btn-default’ classes to our links to give it a button styling. Then within our anchor tag we put some nifty little icons provided by Font Awesome. Now the last part we need is some Javascript to point WYSIHTML5 at our textarea field.
<script>
(function() {
    	var editor = new wysihtml5.Editor("editor", { // id of textarea element
        	toolbar:      "toolbar", // id of toolbar element
        	parserRules:  wysihtml5ParserRules // defined in parser rules set
    	});
})();
</script>
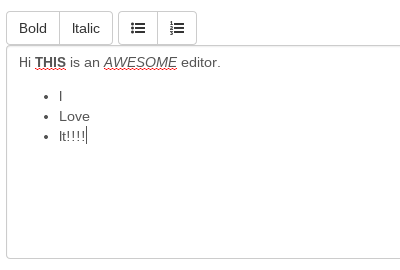
You should now have a nice clean but functional editor that looks like this.